Saturday 31 August 2013

Pick a previous ....

... sketch and colour combination - that's the challenge that Sarah has set for us at 52 {Christmas} Card Throwdown.  You can find our previous sketches here and the colour combinations here.  I had fun going through previous challenges and here's my card:


Stamps: Waltzingmouse - Text-It, Compliments of the Season; Stampin' Up! - Serene Snowflakes
Inks: Versamark; SU - Night of Navy, Bashful Blue
Dies: Lil Inkers - Stitched Circles # 1, 2 and 3
Accessories:  SU Card - Night of Navy; Crystal Glitter; QKR Stampede - Sticky Powder; White Lustre Card


I used Sketch 10 (October 2012) and Colour Combination 16 (April 2013).  I saw this sketch and immediately thought of Christmas baubles, but when I saw the colours I changed my mind and settled on snowflakes!  I masked the edges on the base card and then stamped the text background in Bashful Blue.  I used the lovely stitched circles to cut out the circles (I turned the panel through 180° before attaching it to the card base).  I stamped some snowflakes in Versamark and added QKR StickyPowder which I heated and then added glitter - it works really well and the glitter doesn't shed!  Next I randomly stamped small snowflakes in navy and finished with an appropriate sentiment.  For the inside I cut a mat in navy and on the white panel I stamped snowflakes around the edge and finished with a bold sentiment.  Below is a close up where you can see the snowflakes on the navy panel - they don't show up very well in the main picture.  And you can really see the glitter snowflakes too!


I used a couple of my favourite Walztingmouse stamp sets on this card, so I'm submitting it to the Golden Oldies category over at the Waltzingmouse Pajama Party! 


I'm really looking forward to seeing what combinations you come up with for this week's challenge - see you all soon.

Sorry I've not been around much this week - it seems that going on holiday is not good for my health!!!  I've been feeling really poorly since coming home and last night was the first time I got to play in my craft room.  Have a great weekend!

Saturday 24 August 2013

Christmas embellishment challenge ....

.... Hello!  This is my last scheduled post - we fly back home today!  Sarah has a real challenge for us this week at 52 {Christmas} Card Throwdown - she wants us to use canvas on our card.  I got some sweet self-adhesive canvas embellishments from my local craft shop, but ended up not using them!  In my stash I found some fabulous canvas paper so I used that instead:


Stamps:  Impression Obsession - Zenspirations Christmas Trees; WMS - Nordic Winter. Compliments of the Season
Inks: Stampin' Up! - Real Red, Crumb Cake, Craft White; Archival - Black
Accessories:  SU Card - Crumb Cake, Real Red; Photo Canvas Paper (don't know where I got this); SU Markers - Real Red, Melon Mambo, Pink Pirouette, Daffodil Delight, Wild Wasabi, Soft Suede; SU - Distress Tool

This is not a very big card, only 5" × 3½", small and sweet.  The Christmas tree is from one of my new Impression Obsession sets (got at Heirloom Stamp Show).  The tree has a real folk art feel and works perfectly stamped on the canvas paper.  I coloured the tree with SU marker pens, distressed the edge of the paper and gently pulled out some canvas threads giving a frayed edge, then mounted the image onto some distressed red card.  I made the card base from Crumb Cake card and stamped the Nordic border in white ink - I think the card has a Scandinavian feel.  For the inside I cut a panel of white card, distressed the edges, stamped the tree in Crumb Cake and over stamped a bold Christmas sentiment in red.


I'm really excited to see what you make using canvas on your card.  If you can't get canvas embellishments, you could use some canvas from a fabric shop (I've not tried it, but it should work).  Do visit our blog to check out the inspiration cards from the rest of the team.  See you soon.

Friday 23 August 2013

Chichen Itza ...

... Morning all - today is our last full day in Cancun.  It's been a brilliant holiday.  Beach Palace hotel is fantastic with the most gorgeous ocean front - the view from our balcony is fabulous!!  On the whole we've had fabulous weather, with only a couple of days totally washed out - almost literally.

Last week we went to Chichen Itza - one of the wonders of the world.  It's a long trip, but absolutely worth it.  Our guide was informative and fun - he took us around the ruins and told us about the history.  It was very good, but I would have liked a bit more time for photos.  A friend of mine visited Chichen Itza a while ago and told me that the climb to the top was worth it - sadly (or not) we can no longer climb to the top.  Here are a few of my photos:


Chichen Itza - absolutely magnificent Mayan pyramid


There were loads of iguanas around the place - this one posed just for me!!


I got out my long lens to take this photo!


The whole place is amazing.  Sadly, there are hundreds of vendors allowed inside the area to sell "authentic" Mexican products - our guide advised us to ignore them all as much of the produce sold there is actually made in China!!  Makes for pretty photos though!

On Wednesday this week we went to Xcaret (pronounced Ishkarett)- a magnificent park built in an area that was once a Mayan port.  It is now an archaeological park along with animal displays, areas to swim, including an underground river, and has fantastic shows too.  We swam the underground river - the water was cool but pleasant and I discovered that I'm mildy claustrophobic!!!  I really didn't like having the mask and snorkel on which was a bit sad as I didn't get to enjoy the views of the fish!  Kathryn LOVED it!!  Jonathan took some wonderful photos and if you want to check them out - here's the link to his Flickr account.  I've shared a few here:


Almost a picture postcard view - so beautiful!


Our darling daughter - Kathryn - so pleased that Jonathan managed to get this - she hasn't wanted to have her photo taken this year!


As you can tell - it was really, really hot!!!

Walking along the paths was really nice - so many beautiful plants and then we found this!!!  There's nothing here to suggest scale - it was about 2 inches! 


So for our last day here, we're going to enjoy the sunshine and pool, and then Jonathan has a massage and Kathryn and I are enjoying some girly time together in the beauty salon by having manicures and pedicures!  It's been wonderful.

Do check in tomorrow for the new challenge at 52 {Christmas} Card Throwdown - it's a goody!!  See you soon.

Sunday 18 August 2013

Cancun .....

.... Hi everyone - a quick post from a beautifully hot and sunny Cancun - well, it is today!  You should have seen the rain on Thursday and Friday!!  However, whatever the weather we are having a great time.  I thought I'd share a few pictures that I took yesterday:


Kathryn - walking along the shore front - she didn't want to go!!!


A couple of photos from the Isla Shopping Centre.  Just love the bright, vibrant colours.


Walking back to the hotel with our goodies - Jonathan and Kathryn.


I walked all the way along the beach yesterday morning, right up to where the coast curves - I was out for just over an hour and a half.  So lovely!  Mind, I don't think I'll do the walk again !!
 

A view of the pool from the Sky Bar - it's great fun playing in there!!

Well, that's all for now.  Kathryn wants to play with the computer now.  See you soon.


Saturday 17 August 2013

Christmas recipe - Holly ...

.... Morning all!  This is a scheduled post - as you may have gathered I'm on holiday in Cancun!!  The theme that Sarah has picked for this week's challenge at 52 {Christmas} Card Throwdown is to feature holly on your Christmas card(s).  I had lots of ideas for my card, but finally settled on a clean, simple design in traditional colours:


Stamps: WMS - Festive Foliage, Around Christmas Time, Compliments of the Season; Stampin' Up! - Christmas Messages
Inks: SU - Real Red, Old Olive; Versamark
Dies: Spellbinders - Pinking Circles Lg (S4-170) #3, Pinking Circles Sm (S4-172) #4, Circles Lg (S4-114) #3
Accessories: SU Card - Old Olive, Real Red; White Lustre Card; Black embossing powder; SU Marker Pen - Real Red


I used a sketch from a previous CAS Colour & Sketch challenge - CASC&S37, it works perfectly!  I randomly stamped the trio of holly leaves, the outline holly leaf and holly berries.  I cut the strip to size and edged it with a red marker pen (very subtle), mounted it onto some Old Olive card and adhered it to the card.  I stamped the holly leaf stamp in Versamark, heat embossed it with black powder, cut it out and mounted it on some pinking circles to make a rosette.  I finished the front with an ornate Christmas sentiment.  For the inside I cut a mat layer in Old Olive and on the white panel I stamped a few more holly leaves and added a simple verse for the greeting.


That's all for today - I do hope to get to see your creations this week, but that sort of depends on how much time I lie out in the sun on the golden sand, by the sea!!!  Don't forget to check out the blog to see inspiration cards from the rest of the team.  See you soon.

Saturday 10 August 2013

Ornaments galore ...

.... Hi, it's our colour challenge this week and Sarah has picked Red and Metallic Gold for this week's challenge at 52 {Christmas} Card Throwdown.   With such rich, bold colours I decided to create a card with some Christmas Ornaments:


Stamps: Stampin' Up! - Ornament Keepsakes, Curly Cute; My Favourite Things - Christmas Sentiments
Inks: Archival - Black; SU - Real Red
Dies: Spellbinders - A2 Fancy Weave (S5-136) #3; SU - Holiday Ornament Framelits
Accessories: Gold Card; White Lustre Card; Silks Acrylic Glaze - Carmen; Leather Ribbon


I created the red ornaments by painting the red glaze onto white card, stamping the ornaments and then die cut them.  I have quite a stash of gold card from antique, textured through to this bright gold.  I simply stamped the image and die cut it.  Rather than hang the ornaments from a tree, I decided to create a gold frame and hung them from that.  I attached the red ornaments directly to the card base, but used some dimensional tape to attach the gold one.  I finished the front with a sentiment in red.  For the inside I cut a mat layer in more of the gold card, attached a white panel and stamped a bold Christmas greeting in red.  An elegant card for my collection.


If you've been playing along each week since the beginning of the year you will have about 31 Christmas cards in your stash.  Of course, if you've made multiples you could have lots more!  If you haven't played along yet, then join in with us and get a head start on your cards for this year.  Don't forget to visit our blog and check out the inspiration cards from the rest of the team - they have some wonderful cards to share with you.  That's all for today.  See you soon.

Friday 9 August 2013

Waltzingmouse Christmas Card Challenge and some Exciting news ....

.... It's my pleasure to be the host for this month's Waltzingmouse Christmas Card Challenge.  For my month I decided to go with a colour theme and I opted for bright colours - not traditionally associated with Christmas.  In May we visited Frankenmuth and paid a visit to Bronner's - the world's largest Christmas shop.  While there we saw lots of beautiful Christmas baubles - I happened to find three baubles in the colours I picked - RASPBERRY, TANGERINE AND LIME.


I like Jonathan's photo and decided to be literal and feature Christmas baubles on my cards - I did a set!!


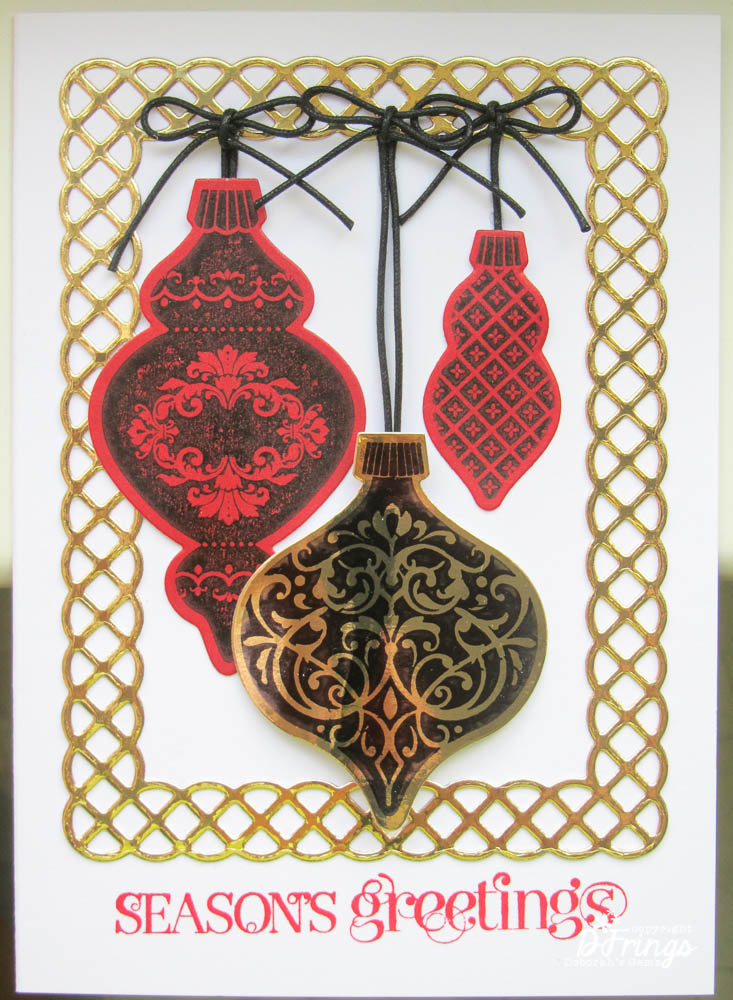
Stamps: WMS - Reverse Crackle BG, Yonder Star BG, Vintage Ornaments, Ornate Ornaments, Compliments of the Season II
Inks: Archival - Black; Distress - Shabby Shutters, Picked Raspberry, Spiced Marmalade; Versafine - Onyx Black; Versamark
Dies: Spellbinders - 2010 Heirloom Ornaments (S4-283) # 4 & 5
Accessories:  Stampin' Up! Card - Pumpkin Pie, Lucky Limeade, Raspberry Ripple, Whisper White; SU Design Paper - Pumpkin Pie; Silks Acrylic Glaze - Key Lime; Martha Stewart Ornament Border Punch; Distress Stains - Shabby Shutters, Picked Raspberry, Spiced Marmalade; Clear embossing powder; Ribbon; Sakura Glaze Pen Black; Glitter

I had lots of fun making the baubles - each made by a different method.  Tangerine - I stamped the bauble outline onto pretty design paper.  Lime - I painted the background with acrylic glaze and stamped on the image.  Raspberry - I stamped Yonder Star background in Versamark, heat embossed with clear powder and then rubbed over with Picked Raspberry.  I added some detail to the tangerine and raspberry baubles with my black Sakura glaze pen.  I also added a touch of glitter to each bauble - can't really see it here!  I made the matching ribbons by dying some white organza ribbon.

To make the background I stamped the Reverse Crackle in Versamark, heat embossed with clear powder and then sponged on all three distress inks, given a lovely subtle background.  I cut the panels to fit the card bases and punched the ornament border along the bottom.  I used Stampin' Up! card to make the coordinating card bases.  It was only when I finished, I realised that I've actually CASEd the card I made for WMSC127 - I obviously like the design!!!  For the inside of each card I stamped a sentiment and another bauble - to coordinate with the card.  Here are some larger images of each card as well as one of the inside!


I can't wait to see what you make with these non-traditional colours!  Here are some guidelines for the challenge:

• Each card must contain some Waltzingmouse Stamps’ images but need not be exclusively WMS images.
• Once you have created your project, upload it to the 2013 WMSCCC gallery - and if you have a blog, we would love for you to post it there too!  The code for this month is WMSCCC08-13.
• Feel free to grab the WMS Christmas Card Logo for your blog sidebar and/or your blog post if you are so inclined.
• You may make as many projects as you like for each challenge. We encourage you to make batches of cards since our end goal is to have enough hand-made Christmas cards for each person on our “list”.
• You may play along when and if you want – make it suit your schedule. For example, challenge cards for January may be uploaded anytime in January or in June or even September...whenever you have them completed. There is no monthly deadline.

Now, before I go, I've got some very exciting news to share with you.  Some of you may have noticed, and indeed already started to follow, a new challenge - Waltzingmouse Fanatics Challenge.  When I was on holiday in the UK in July, I had the great good fortune to meet up with my blog buddy, Tara Cardwell.  We got chatting about our love of Waltzingmouse Stamps and how much we missed the weekly sketch challenge.  So you can imagine how thrilled I was when Tara emailed me to say she was setting up a new challenge and wanted me to join her on the design team.


So, starting in September we have a new challenge for all Waltzingmouse Fans - come and join us.  Do keep an eye on the blog for more news and also check out our Facebook page.

That's all for now - I've got a very busy day today - details will follow!!  See you tomorrow.

Thursday 8 August 2013

Colour wheels ...

.... Morning all!  You know when you have a "brilliant" idea and then when you do it, you find it wasn't quite such a good idea - well, my card today is a perfect example!!!  I used the following challenges to make it:

Stamps: Sweet Stamp Shop - Colour Wheel; The Stamps of Life - Words4crayons
Inks: Versafine - Onyx Black
Dies: Spellbinders - Circles Lg (S4-114) #5, On the Edge (S5-168)
Accessories:  Various designs papers and card scraps (too many to mention); White Lustre Card; SU Marker Pens - Real Red, Tangerine Tango, Daffodil Delight, Garden Green, Pacific Point; Hessian Ribbon


So what was my brilliant idea?  Part of the UWYH challenge is to work on the stash you have and I have a large vast collection of paper and card scraps.  And, as I like to paper piece and I thought it would be a great way to use up some of this stash.  I obviously didn't think it through very well, as it took me ages to stamp and piece the colour wheel!!! While I'm delighted with how it turned out - I'm not sure I'll be doing it again soon :)  Here's a close up of the colour wheel showing the different papers and card I used, and you can see the tiny button too - matched to the scalloped trims.


Here are a few photos of some of my paper stash - I really must use it more often, but on a less time consuming project :)


As I type this post - I'm listening to Richard Thompson's 1000 Years of Popular Music on Spotify - such a good album and really puts you in a great mood for the day!  Here's a link to a quick review of some of the songs on the album:


That's all for now - have a great day!

Related Posts Plugin for WordPress, Blogger...